Showing posts with label Recipes. Show all posts

Thursday, January 5, 2012

Scallion Meatballs


You know another website I love? Smitten Kitchen. The pictures are so pretty! How can you not want to eat everything on her blog when it's photographed so well? Unlike my crappy iPhone pictures. Bare with me. I'll get a better camera soon :) Or an iPad. Not sure which one I really, really need yet.


I've been in the cooking mood. Maybe more like a frenzy. School doesn't start for another week and I've got so many projects on my list to get done before then. Cooking and freezing a few great meals is one of my goals. These were so simple to make. Next time I'll probably bake them though instead of frying. It's better for you and I didn't like all the splattering on my arms. Other than that, there's absolutely no need to change anything about this recipe. It's perfect. Absolutely perfect.


Scallion Meatballs with Soy-Ginger Glaze (taken from www.smittenkitchen.com)


Sauce
1/2 cup dark brown sugar
1/2 cup water
1/2 cup soy sauce, preferably Japanese or reduced sodium
1/2 cup mirin (sweet rice wine), or 1/2 cup sake with 1/4 cup sugar
1/4 cup peeled, chopped ginger (I used half and it tasted like plenty to me; adjust to your preference)
1 teaspoon ground coriander
4 whole black peppercorns (no, I did not count how many I put in there)
Meatballs
1 pound ground turkey
4 large or 6 small scallions, finely chopped
Half bunch cilantro, finely chopped (about 1/2 cup) (the cilantro-averse can use flat-leaf parsley)
1 large egg
2 tablespoons sesame oil, toasted if you can find it
2 tablespoons soy sauce
Freshly ground black pepper
Vegetable oil

Make sauce: Bring sugar and water to a boil in a small saucepan over medium-high heat, stirring until sugar melts completely. Reduce heat to a medium-low and add soy sauce, mirin, ginger, coriander and peppercorns. Simmer, stirring occasionally, until reduced by half, about 30 minutes, though this took me a bit longer to reduce it until it was syrupy enough that I thought it would coat, and not just dribble off the meatballs. You can keep it on a back burner, stirring it frequently, while browning the meatballs in the next step. Once it has reduced to your satisfaction, strain through a sieve.

Make meatballs: Mix turkey, scallions, cilantro, egg, sesame oil, soy sauce and several grindings of black pepper in a bowl. I like mixing meatballs with a fork; it seems to work the ingredients into each other well. Roll tablespoon-sized knobs of the mixture into balls. The mixture is pretty soft; I find it easiest to roll — eh, more like toss the meatballs from palm to palm until they’re roundish — meatballs with damp hands.
In a skillet over medium-high heat, generously cover bottom of pan with vegetable oil. Working in batches to avoid crowding, place meatballs in pan and cook, turning, until browned all over and cooked inside, about 8 minutes per batch. Arrange on a platter (a heated one will keep them warm longer), spoon sauce over each meatball, and serve with toothpicks. Alternatively, you can serve the glaze on the side, to dip the meatballs.

Wednesday, January 4, 2012

Vodka Cream Sauce

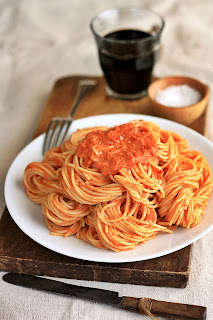
Spaghetti with Tomato Vodka Cream Sauce
I've developed a new obsession in a website called Pinterest. Have you heard of it? It's marvelous! Pictures, ideas, crafts, recipes, and much more all in one website. Check it out. You won't regret it!

This recipe came from Pinterest. Actually it's a "pin" from the Cooking Light website but I saw it first on Pinterest. So they get the credit :) So much lighter and easier to make than other vodka sauces I've eaten/made in the past. The sauce combines some of my favorite ingredients into a delicate sauce. Garlic, onion, alcohol, sea salt! Glorious! I also like how loose this sauce is. Dense ones are too heavy and this sauce is anything but heavy. One note though, do NOT try and substitute half-n-half for the heavy cream. It needs the cream. Trust me. So splurge on the 1/4 cup that's in it. It's really not that much.

Vodka Pasta Sauce (adapted slightly from the Cooking Light website)
Serves 2 to 3

1/4 pound angel's hair pasta
1 Tbsp olive oil
1/2 cup finely chopped onion OR 2 to 3 shallots
Scant 3/4 tsp salt, divided
1/8 to 1/4 tsp crushed red pepper OR 1 dried red chili, minced
1 garlic clove, minced
1/2 cup vodka
1/2 cup vegetable or chicken broth
1 (14.5-ounce) can diced tomatoes, undrained
1/4 cup whipping cream
3 Tbsp thinly sliced fresh basil
Shaved or grated parmesan cheese, to garnish
Additional fresh basil leaves (optional)

Cook the pasta according to the package directions. Drain and keep warm.

Heat oil in a large nonstick skillet over medium-high heat. Add onion to pan; sauté 4 minutes or until tender. Add 1/4 teaspoon salt, pepper, and garlic; sauté 1 minute. Add vodka (when cooking with alcohol, there is always the chance of it catching on fire, so be very careful); bring to a boil. Reduce heat, and simmer 3 minutes or until liquid is reduced by about half. Stir in scant 1/2 teaspoon salt, broth, and tomatoes; bring to a boil. Reduce heat, and simmer 15 minutes. Remove skillet from heat and let cool slightly.

If you have stick blender, you can now puree the sauce right in the pan (I prefer this way) Or, place tomato mixture in a conventional blender. Remove center piece of blender lid (to allow steam to escape); and secure the lid on blender. Place a clean towel over opening in blender lid (to avoid splatters), and process until smooth. Return tomato mixture to pan.

Mix in cream, then cook the sauce for 2 minutes over medium heat, stirring constantly. Remove from heat. Stir in cooked pasta and basil. Taste the pasta and adjust seasoning if needed. Serve immediately.

Tuesday, April 5, 2011

A new recipe


I visited a close girlfriend last weekend who asked me to post a new recipe for you all. And so I will oblige :) I haven't been cooking a whole lot. My work schedule keeps me away during the dinner hour nowadays but I did make this one a few weekends ago. The original recipe is from the Bon Appetit website but I modified it (blame my mother if you think I can't stick to a recipe. She made me the way I am! ;) ). The recipe is now gluten and dairy free! Because that's what our family needs. You can view the non-dairy free recipe by clicking the link below (it was always gluten free, unless you put it on top of pasta or something. Which I would be inclined to do).

Chicken and Carrot Stew

2 cups thickly sliced peeled carrots
1 1/2 cups thinly sliced leeks (I used onion instead)
1 1/4 lb boneless skinless chicken thighs, cut into 2 in. cubes
2 T cornstarch or tapioca starch
1 t chopped fresh thyme
1 t paprika
2 T olive oil
1/2 c dry white wine
1/2 c low sodium chicken broth
1/4 c coconut milk yogurt
1 T Dijon mustard
1/4 c fresh Italian parsley
Sea Salt to taste

Cook carrots in large saucepan of boiling salted water 3 minutes. Add leeks to pan with carrots and cook until carrots are tender, about 3 minutes longer. Drain and set aside.

Sprinkle chicken with sea salt and freshly ground black pepper. Whisk cornstarch, thyme, and paprika in medium bowl. Toss chicken in mixture.

Heat oil in heavy large nonstick skillet over medium- high heat. Add chicken to skillet and cook until browned, about 2 minutes per side. Add wine; boil until reduced by half, 2 to 3 minutes. Scatter carrots and leeks over chicken. Add broth, cover, and simmer until chicken is cooked through, about 15 minutes. Add yogurt and mustard. Stir until sauce thickens slightly, about 2 minutes. Season sauce to taste with sea salt and pepper. Transfer to large shallow bowl and serve. Bon Appetit!


Calorie Content: 367 calories per 1 cup serving


Wednesday, December 15, 2010

A long lost sweet potato recipe

For 3 years, I lived with 4 other girls that all didn't particularly like sweet potatoes. How they all could have been raised to dislike this yummy, tantalizing potato is beyond me but it happened. But, all of them LOVED this recipe, which comes from the archives of Williams-Sonoma. It's no longer available on their website or any of their new cookbooks, not sure why. It should be. I'm not trying to toot my own horn but I am a pretty decent cook. Not everything I attempt is a hit but I do like trying! This recipe ranks among my top successes. I've brought it to Thanksgiving and other holiday potlucks for several years now and no one, even the most passionate sweet potato hater, has ever said they didn't like it. I mean come one, it's got almost 2 entire sticks of butter in it and a topping like apple crisp. Does it get any better than that? So consider this your lucky day. You've just found the best holiday side dish there is :)

Ingredients:

Pecan/Brown Sugar Topping:
• 1 cup flour
• ¾ cup firmly packed light brown sugar
• 1 teaspoon salt
• 1 teaspoon ground cinnamon
• 8 tablespoons cold unsalted butter, cut into half inch cubes
• 1 cup toasted chopped pecans

Sweet Potatoes:
• 5 pounds sweet potatoes
• ¼ cup milk
• 2 teaspoons vanilla
• 6 Tablespoons unsalted butter melted
• 3 eggs• ½ cup maple syrup
• ¼ cup firmly packed light brown sugar
• 2 teaspoons kosher salt
• Pepper to taste
• Pinch of freshly grated nutmeg (optional)

Instructions:
  • Preheat oven to 450 degrees.
  • Place potatoes in a large roasting pan with a small amount of water, cover the pan tightly with aluminum foil, cook potatoes until tender, about an hour to an hour and a half. Transfer potatoes out of pan and let cool.
  • Reduce oven to 350 degrees.
  • Peel off potato skins when cool, cut the flesh into half-inch cubes.
  • Transfer ¼ of potatoes to a large bowl and mash with a potato masher. Add the remaining potatoes and stir.
  • In a separate bowl whisk together the milk, vanilla, butter, eggs, maple syrup, brown sugar, salt, pepper and nutmeg. Add mixture to the sweet potatoes.
    For the topping, prepare in a bowl — stir flour, brown sugar, salt, cinnamon, butter, then toasted pecans, the topping should hold together in your fingers but crumble easily.
  • Transfer potato mixture to a large rectangular baking dish and sprinkle with topping.
  • Bake around 45-60 minutes or until the top is crisp and brown.

Tuesday, August 17, 2010

Limoncello Fruit Salad


I made this very summery dish last night for my family and it was just scrumptious! We still have 2 bottles of limoncello in the freezer from our cruise 3 years ago and so I'm constantly trying to find recipes to use it in. It's potent stuff! This dish was elegant, easy, and nutritious. A perfect compliment to a summer menu!


Ingredients
• 7 ounces Greek yogurt
• 1/3 cup good bottled lemon curd
• 1 tablespoon honey
• 1/4 teaspoon pure vanilla extract
• 2 cups sliced strawberries (1 pint)
• 1 cup raspberries (1/2 pint)
• 1 cup blueberries (1/2 pint)
• 2 tablespoons sugar
• 3 tablespoons limoncello liqueur
• 1 banana, sliced
• Fresh mint springs

Directions

For the lemon yogurt topping, whisk together the yogurt, lemon curd, honey, and vanilla and set aside at room temperature.
For the fruit salad, carefully toss together the strawberries, raspberries, blueberries, sugar, and limoncello. Allow them to stand at room temperature for about 5 minutes to let the berries macerate with the sugar and liqueur. Gently fold the banana into the mixture.
Serve bowls of fruit with a dollop of lemon yogurt on top. Top each with a sprig of fresh mint.

Tuesday, July 20, 2010

Apricot Walnut Rugelach


Cream cheese has been free or close to it for weeks now at different grocery stores around town. I don't know about you but I can't pass up anything that's free. But what do you do with half a dozen packages of cream cheese? Well, here's a great recipe for you to try! It's a flaky, glossy, slightly sweet cookie that my family begs for. It's also very easy. If you're in need of a non-cheesecake recipe to use the cream cheese coming out your ears, try this one. You won't be disappointed.

P.S. If you don't already have cream cheese in your frig, it's free yet again at King Soopers this week! :)

Apricot Walnut Rugelach

Cook Time: 25 minutes

Ingredients:

DOUGH:
• 14 tablespoons of butter
• 8 ounces (1 pkg) cream cheese
• 1/4 cup sugar
• 1 teaspoon vanilla extract
• 2 cups all-purpose flour

APRICOT AND WALNUT FILLING:
• 1 cup apricot jam
• 1/2 cup finely chopped walnuts

TOPPING:
• 1 egg
• 1/4 cup sugar

Preparation:
1. In a mixing bowl, cream the butter and cream cheese together. Add sugar and vanilla, and mix until smooth. Add flour and mix lightly. Refrigerate dough for an hour or more.
2. Preheat oven to 350 degrees
3. Divide the dough into four balls. On a floured surface, using a floured rolling pin, roll one ball out into a circle until about 1/8 inch thick.
4. Spread the apricot preserves in the center of the circle, and then sprinkle the walnuts on top.
5. Cut the pastry into pie-shaped wedges. For bite-size and nice looking rugelach, the thick end of the wedge should about an 1 to 1 1/2 inch wide.
6. Start at the wide edge of the wedge and roll the dough up toward the point.
7. Line a cookie sheet with parchment paper. Place each pastry, seam side down, on the paper.
8. Brush each pastry with the egg and sugar.
9. Bake for 20-25 minutes or until golden.

TIPS:
1. For a softer dough, use 1/2 cup of confectioners' sugar in the dough instead of the 1/4 cup of sugar.
2. Using too much filling leads to messy looking rugelach.
3. A pizza cutter makes it easier to cut the dough into pie-shaped wedges.
4. If you don't want to use parchment paper, you can spray the cookie sheets with non-stick spray. But I highly recomment parchment paper. It makes for such easy cleanup.
5. After rolling the dough up and placing on the parchment paper, you can stick them in your freezer. When you need fresh rugelach, take them right from the freezer into the oven and add a few minutes to the baking time.

Tuesday, July 6, 2010

Using Leftovers

Leftovers. In our household, that's a dreadful word. We do not like leftovers; especially any carbs reheated. Reheated pasta, bleh! But when you've got a strict food budget you're trying to adhere to, wasting food is out of the question. So, how do we find or create recipes we like that use up those 3 day old potatoes? Or the steak, pasta, rice, veggies... you get the picture. It's not easy sometimes but here's a few ideas that our family will eat. They're not just reheated. They're transformed into something new. That's why we like them!

1. Potato Pancakes (Click HERE for the recipe): This is probably our favorite way to use leftovers. Sometimes I make mashed potatoes just so I can make these the next day. You don't have to have them for breakfast. We've eaten them with hot dogs or steak for dinner too! Top them with ketchup and they're just great!

2. Quesadillas: (Click HERE for a recipe) Use any type of leftover meat (chicken, steak, pork, crab) and make yummy quesadillas with them! My mom used to make them in the morning and send them with us to school. They're still great at room temperature.

3. Soups: We grew up on homemade chicken soup. Usually we'd have roasted chicken first and then mom would stew the leftover chicken for the broth and add the leftover meat at the end. You could do this with really any type of meat. Make beef-vegetable soup or a pork green chili. This is a great way to use leftovers!

4. Casseroles: This is one way to use leftovers that I didn't grow up on. But there's some great recipes out there. Try Basic Leftover Casserole or Mexican Casserole. Both look good to me!

So, what's your favorite way to use leftovers? Or do you just feed them to the dog? :)

Sunday, May 30, 2010

A new recipe

I've been in a baking and cooking mood this week but it's been so hot that I've not wanted to be in the kitchen for long. But today, I awoke to the birds singing and a gorgeous high of 67 degrees. Don't you just love Colorado? So, I just had to attempt a new recipe. Bourdon Handheld Peach Pies. Oh my goodness, I'm in Heaven! A Samantha tidbit for you; I love to cook with alcohol. I have a slight allergy to alcohol so I can't (nor would I really want to) down a shot of liquor. But I can savor the flavors when it's baked or cooked into something! This recipe is a bit of work though. It's a pastry dough so it's time-consuming. I was apprehensive about that because I'm not the best baker. Cooking, I'm quite good at, but not baking. But the sour cream in the dough made it heartier and less prone to toughness if overworked a bit. Feel free to substitute plain yogurt for the sour cream! I did and it came out just fine!


Peach Hand Pies

As I said before, these are time-consuming but there is a reason for all the chilling. The dough is high in butter (for flakiness) and when warm, it's very hard to handle. Follow the recipe, you won't be disappointed!

Slightly adapted from Smitten Kitchen
Makes 14 to 24 (depending on cutter size)

For the pastry:
2 1/2 cups all-purpose flour
1/2 tsp. salt
16 tablespoons (2 sticks, 8 ounces) unsalted butter, cut into
pieces
1/2 cup sour cream (or plain yogurt)
4 teaspoons fresh lemon juice
1/2 cup ice water

For the filling:
2 cans of sugar free peaches (or fresh but then you'll need more sugar)
1/4 cup flour
1/8 cup sugar or Splenda substitute
Pinch of salt
1 teaspoon bourbon
1/2 teaspoon vanilla extract

One egg yolk beaten with 2 tablespoons water (for egg wash)
Coarse sanding sugar, for decoration

1. To make the pastry, in a bowl, combine the flour and salt. Place the butter in another bowl. Place both bowls in the freezer for 1 hour. Remove the bowls from the freezer and make a well in the center of the flour. Add the butter to the well and, using a pastry blender, cut it in until the mixture resembles coarse meal. Make another well in the center. In a small bowl, whisk together the sour cream, lemon juice and water and add half of this mixture to the well. With your fingertips, mix in the liquid until large lumps form. Remove the large lumps and repeat with the remaining liquid and flour-butter mixture. Pat the lumps into a ball; do not overwork the dough. Cover with plastic wrap and refrigerate for 1 hour. If preparing ahead of time, the dough can be stored at this point for up to one month in the freezer.

2. Divide the refrigerated dough in half. On a lightly floured work surface, roll out one half of the dough to 1/8-inch thickness. Using a 4 1/2-inch-round biscuit cutter, cut seven circles out of the rolled dough. Transfer the circles to a parchment-lined baking sheet, and place in the refrigerator to chill for about 30 minutes. Repeat the rolling, cutting, and chilling process with the remaining half of dough. (I used a 4-inch cutter–if you can call a “cutter” the tin edge of the container that holds my smaller round cutters–and managed to get 12 from each dough half, after rerolling the scraps.)

3. Make the filling: Chop the peaches into small bits (approx. 1/2-inch dice), much smaller than you’d use for a regular-sized pie. Mix them with the flour, sugar and pinch of salt, and add the bourbon and vanilla.

4. Remove the chilled dough from the refrigerator, and let stand at room temperature until just pliable, 2 to 3 minutes. Spoon about 1 to 2 tablespoons filling (use the smaller amount for a 4-inch circle) onto one half of each circle of dough. Quickly brush a little cold water around the circumference of the dough, and fold it in half so the other side comes down over the filling, creating a semicircle. Seal the hand pie, and make a decorative edge by pressing the edges of the dough together with the back of a fork. Repeat process with remaining dough. Place the hand pies back on the parchment-lined baking sheet, and return to the refrigerator to chill for another 30 minutes.

5. Heat oven to 375 degrees. Remove the chilled hand pies from the refrigerator, cut a small slit in each and lightly brush with the egg yolk wash. Sprinkle sanding sugar generously over the pies, and place pies in the oven to bake. Bake until the hand pies are golden brown and just slightly cracked, about 20 minutes. Remove the pies from the oven, and let stand to cool slightly before serving.